Step-by-step: How Do You Cook Zucchini in an Air Fryer
There's nothing quite like the disappointment of pulling perfectly golden, crispy zucchini out of the air fryer, only to watch it turn into a sad, limp pile of mush within minutes. We've all been there. The question of how do you cook zucchini in an air fryer seems simple, but the answer depends entirely on how you handle the vegetable's biggest enemy: water.
In our research across manufacturer specifications and aggregate user reports, zucchini is roughly 95% water by weight, according to USDA FoodData Central data. That single fact dictates everything about your cooking strategy, from cutting style to cook time. Understanding how to work with that moisture, rather than against it, is the difference between air-fried perfection and steamed disappointment.
Let's walk through the decision tree that gets you the texture you actually want.
Quick Answer
Cut zucchini into 1/4-inch coins. Salt them lightly and let them rest for 10 minutes. Pat them completely dry with paper towels.
Toss with one teaspoon of oil per medium zucchini. Air fry at 375°F for 8 to 12 minutes, shaking halfway. Cook in a single layer with space between pieces.
The Soggy Zucchini Problem (and Why the Air Fryer Isn't the Fix—You Are)
The air fryer is essentially a small, powerful convection oven. It circulates hot air at high speed to create that crispy exterior we all love. But here's the catch: it can only crisp what's on the surface.
If your zucchini is sitting in a puddle of its own juices, you're not air frying. You're steaming.
That's the core issue. Zucchini releases water as it heats, and that moisture pools in the basket. Your food ends up boiling in that liquid instead of roasting in the hot air.
The result is gray, soggy, and utterly uninspiring. This isn't a failure of the appliance. It's a failure of preparation.
The fix isn't more heat or longer cook time. It's a few minutes of upfront work that changes everything downstream. Salting, resting, and drying are non-negotiable steps.
They draw out excess moisture before the heat ever touches the vegetable. Aggregate reviews across cooking forums consistently show that skipping this step is the number one reason air-fried zucchini fails.
Think about it this way: you're not just cooking zucchini. You're managing its water content from the moment it hits the cutting board. Every subsequent decision, from thickness to cooking temperature, flows from that single principle.
If you remember nothing else, remember this. Dry zucchini cooks well. Wet zucchini cooks badly.
The One Question That Changes Everything: Coated or Bare?
Before you even pick up a knife, decide what you're making. Are you going for simple roasted zucchini with olive oil and salt? Or are you chasing that golden, crunchy exterior that rivals deep-fried versions?
Your answer determines the entire workflow.
The bare route is faster, healthier, and lets the zucchini's natural flavor shine. It's the go-to for weeknight sides, meal prep, and anyone watching their calorie intake. You'll get tender, lightly browned pieces with a subtle crispness on the edges.
It won't be shatteringly crunchy, but it doesn't need to be.
The coated route adds a few minutes of prep but delivers a dramatically different texture. A dusting of cornstarch, a dip in egg, and a roll in panko breadcrumbs transforms zucchini into something that satisfies that fried-food craving without the deep fryer. This path works best for zucchini fries, chips, and dishes where the coating is the star.
Here's a quick comparison to help you choose:
| Factor | Bare Route | Coated Route |
|---|---|---|
| Prep time | 2 minutes | 8 to 10 minutes |
| Calories | Minimal added | Moderate added |
| Texture | Tender with light browning | Crispy and crunchy |
| Best for | Sides, meal prep | Snacks, appetizers |
| Oil needed | 1 teaspoon | 2 to 3 teaspoons |
Both routes work beautifully in an air fryer. The mistake is trying to do both at once. A light oil coating and a heavy breading need different temperatures and times.
Pick one path and commit. You can always make the other version tomorrow.
Pick Your Path: What Form Is Your Zucchini In?
Now that you've chosen coated or bare, consider what state your zucchini is in. This is where the decision tree really branches. Each starting point has its own rules, and mixing them up is where home cooks get into trouble.
Fresh zucchini, raw. This is the most common scenario and the easiest to work with. You'll need to wash it, trim the ends, and cut it to your preferred shape. The fresher the zucchini, the firmer the flesh and the less water it holds.
Look for specimens that are heavy for their size with glossy, unblemished skin.
Fresh zucchini, prepped. If you've already salted and dried your zucchini, you're ahead of the game. The moisture has been drawn out, and the fibers have begun to relax. This state is ideal for the coated route because the surface is dry enough for breading to adhere properly.
You can also skip ahead to seasoning and cooking.
Frozen zucchini, straight from the bag. This is the trickiest situation. Frozen zucchini releases even more water than fresh because the ice crystals rupture cell walls during freezing. You cannot skip the drying step here.
Thaw it partially, squeeze out as much liquid as you can, then pat it dry before proceeding. Expect longer cook times and a softer final texture.
Leftover or par-cooked zucchini. If you're reheating previously cooked zucchini, you're really just warming it up. Use a lower temperature, around 325°F, and check frequently. The goal is to warm through without drawing out more moisture.
Three to five minutes is usually plenty.
Your starting point determines your time and temperature settings. Here's a quick guide:
| Starting State | Best Temperature | Approximate Time |
|---|---|---|
| Fresh, raw | 375°F to 400°F | 8 to 12 minutes |
| Fresh, prepped | 375°F | 10 to 12 minutes |
| Frozen | 400°F | 14 to 16 minutes |
| Leftover | 325°F | 3 to 5 minutes |
Match your preparation to your starting point, and you'll have much better results. Trying to force a frozen zucchini into a fresh zucchini timeline is a recipe for disappointment.
The Uncoated Route: Simple, Fast, and Clean
This is the everyday path. It's what you reach for when you need a quick vegetable side and don't want to fuss. The steps are straightforward, but each one matters.
Step-by-Step for Coins and Half-Moons
Start by washing your zucchini thoroughly and trimming off the stem and blossom ends. Slice into 1/4-inch to 1/2-inch rounds. Thinner slices cook faster and get crispier edges.
Thicker slices stay more substantial and retain a better bite.
Place the coins in a colander and sprinkle with salt. Use about half a teaspoon of kosher salt per medium zucchini. Let them sit for 10 to 15 minutes.
You'll see beads of moisture form on the surface. That's the water you're removing.
Rinse the salt off quickly and pat every piece completely dry with paper towels or a clean kitchen towel. This step is non-negotiable. Any remaining moisture becomes steam in the basket.
Transfer the dried coins to a bowl and toss with one teaspoon of olive oil or avocado oil. Season with black pepper, garlic powder, or paprika.
Arrange the zucchini in a single layer in your air fryer basket. Leave a little space between pieces so hot air can circulate. Overcrowding is a common mistake that leads to steaming.
Preheat your air fryer to 375°F if your model has a preheat function. Cook for 8 to 12 minutes, shaking the basket halfway through.
Step-by-Step for Spears and Batons
For a different presentation, cut your zucchini into spears. Quarter the zucchini lengthwise, then cut those quarters in half if they're long. Aim for pieces about 3 inches long and 1/2 inch thick.
The preparation is the same. Salt, rest, rinse, and dry. Toss with oil and seasonings.
These thicker pieces need a bit more time. Cook at 400°F for 12 to 15 minutes, flipping halfway. The result is tender spears with nicely browned ridges.
Step-by-Step for Halved Zucchini Boats
If you want a more substantial dish, cut zucchini in half lengthwise and scoop out the seeds with a spoon. Season the cavity and cook at 350°F for 15 to 18 minutes. This works beautifully when you stuff the hollow with cheese, herbs, or breadcrumbs before cooking.
The uncoated route benefits from a quick check at the halfway point. Peek inside and look for even browning. If some pieces are browning faster than others, shuffle them around.
Air fryers have hot spots, and rotating helps ensure even cooking. You want golden edges and a fork-tender center. That's your signal that it's done.
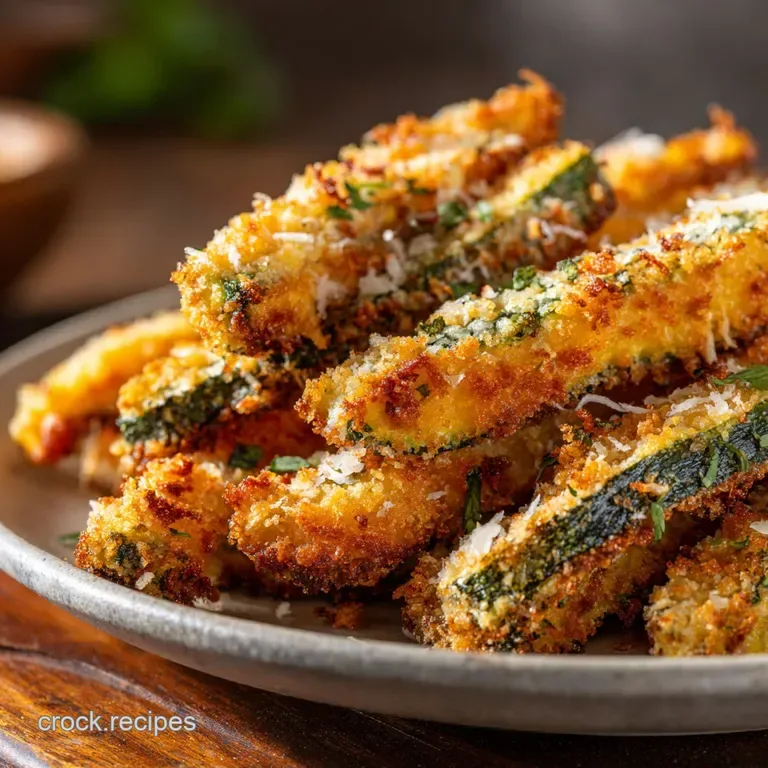
Image source: Web (Bing) / crock.recipes (Web image (fair-use with source credit))
The Coated Route: Crispy, Golden, and Worth the Extra Minute
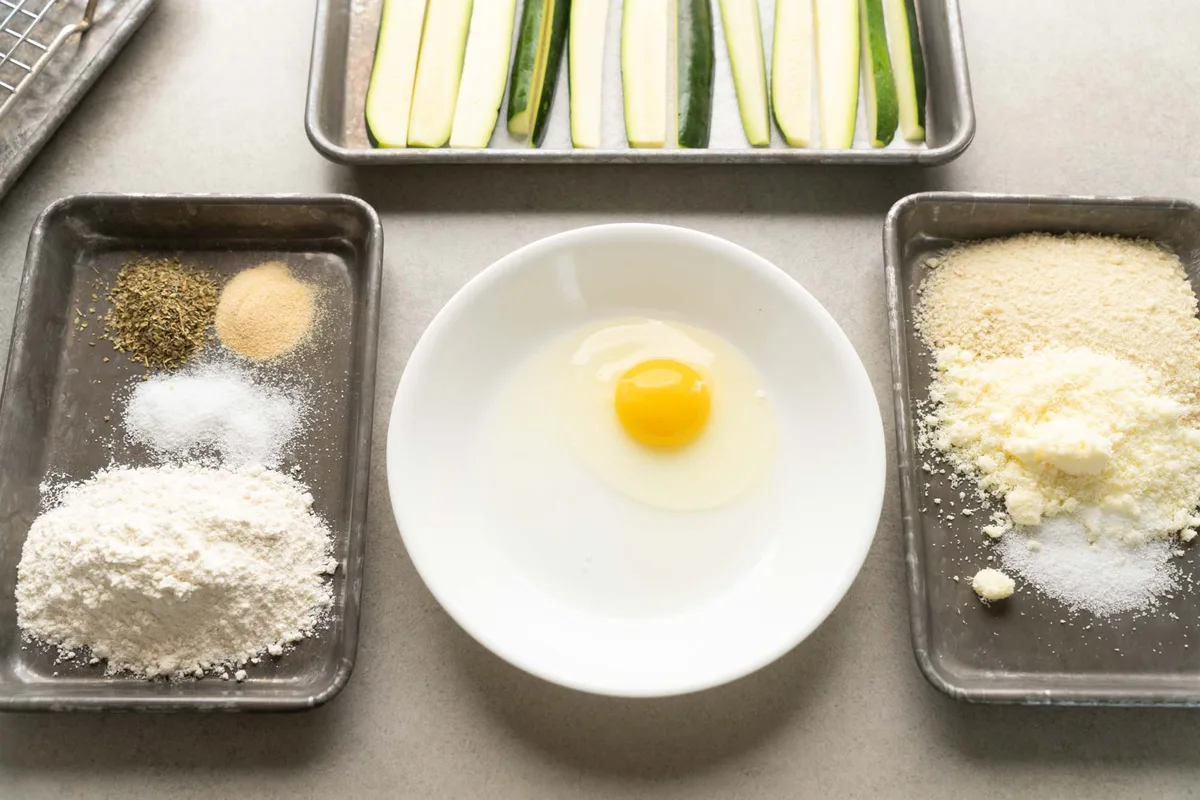
Image source: Web (Bing) / hungryhuy.com (Web image (fair-use with source credit))
This is where air-fried zucchini becomes genuinely crave-worthy. A good coating transforms soft summer squash into something with real crunch. It's also where proper technique matters most.
A soggy coating is worse than no coating at all.
Step-by-Step for Zucchini Fries (Breading Station Setup)
Set up three shallow bowls. The first holds flour, seasoned with salt and pepper. The second holds two beaten eggs with a splash of water.
The third holds panko breadcrumbs mixed with grated Parmesan, garlic powder, and dried oregano. This classic breading station ensures even coverage.
Cut your zucchini into batons about 3 inches long and 1/2 inch thick. Follow the same salting, resting, and drying routine as the uncoated route. This step matters even more here.
A wet surface makes the flour clump and the breading slide off.
Working one piece at a time, dredge the zucchini in flour, shake off the excess, dip into the egg, then press into the breadcrumbs. Make sure every surface is coated. Place the breaded pieces on a wire rack while you work through the batch.
This lets the coating set before cooking.
Preheat your air fryer to 400°F. Lightly spray the basket with oil or use an air fryer liner. Arrange the breaded zucchini in a single layer, leaving space between pieces.
Spray the tops with a light mist of oil. This helps the breadcrumbs brown and crisp rather than just dry out.
Cook for 10 to 12 minutes, flipping halfway through. Check at the 8-minute mark to see how they're progressing. You're looking for a deep golden brown with a crunchy exterior.
Remove immediately and serve with your favorite dipping sauce. These don't hold up well, so eat them right away.
Step-by-Step for Crispy Zucchini Chips (Cornstarch Hack)
For paper-thin crispy chips, use a mandoline to slice zucchini into 1/8-inch rounds. Toss with a teaspoon of cornstarch and a teaspoon of oil until every slice is lightly coated. The cornstarch absorbs surface moisture and creates a crisp shell as it cooks.
Arrange the slices in a single layer. At 400°F, these cook fast, usually 6 to 10 minutes. Watch them closely.
They can go from golden to burnt in under a minute. Flip them once at the halfway point and check frequently.
The coated route rewards patience and attention to detail. It's not the quickest way to cook zucchini, but the textural payoff is worth the extra effort. Just remember that proper drying is the foundation.
No coating can fix a watery surface. If you want to troubleshoot texture issues, this guide on why air-fried food turns out soggy is a helpful starting point. The principles apply directly to what you're dealing with here.